Spring入门篇:IOC&AOP
本文[1]包含:
- 核心功能:IOC容器
- 核心功能:AOP面向切面编程
为什么要使用spring框架
Spring框架的历史
Spring框架的起源可以追溯到2003年,当时Java企业版(Java EE)平台的开发模式正处在EJB(Enterprise JavaBeans)主导的时代。尽管EJB为企业级应用提供了丰富的功能,但其复杂的编程模型、重量级的架构以及部署方面的挑战让许多开发者感到困扰。正是在这种背景下,Rod Johnson在其著作《Expert One-on-One J2EE Design and Development》中阐述了一种新的、轻量级的编程范式,并随后发布了Spring框架的第一个版本。
Spring框架的诞生旨在简化企业级应用的开发过程,降低其复杂度,并倡导基于POJOs(Plain Old Java Objects)的编程方式,从而彻底改变了Java应用的开发格局。随着时间的推移,Spring逐渐发展成为一个全方位的Java应用框架,涵盖了从核心容器、数据访问、Web开发到AOP(面向切面编程)、消息传递等多个领域。
Spring是什么
Spring框架本质上是一个开源的、轻量级的Java应用程序框架,它不强制开发者遵循特定的设计模式或架构,而是通过提供一套全面的服务和工具来提升开发效率和应用质量。Spring的核心特性之一是Inversion of Control(IoC,控制反转)和Dependency Injection(DI,依赖注入)机制,这些设计原则使得组件之间的耦合度大大降低,提高了代码的可测试性和可维护性。
为什么要使用Spring
选择Spring的理由有很多,其中包括:
- 简化复杂性:Spring通过自身强大的容器管理对象的生命周期和依赖关系,减轻了开发者手动处理对象创建和管理的负担。
- 轻量级与模块化:Spring框架本身轻量且高度模块化,可以根据项目需求选择合适的模块,而不是一股脑加载所有功能,这有助于减少资源消耗并提高性能。
- 松耦合:通过依赖注入实现组件间的松散耦合,使得各个部分更易于复用和替换,增强了系统的灵活性和可扩展性。
- 广泛的兼容性与集成性:Spring能够无缝集成众多第三方库和框架,例如Hibernate、MyBatis、JPA用于持久化,或是与其他Web框架、消息队列等协同工作。
- 增强测试能力:Spring对单元测试的支持良好,开发者可以更容易地对代码进行隔离测试。
- 企业级服务:Spring提供的事务管理、安全性、远程调用等功能使得开发企业级应用更为便捷。
综上所述,Spring框架不仅解决了传统企业级Java开发中的诸多痛点,而且凭借其不断发展的生态系统和持续的技术创新,成为了现代Java应用开发的事实标准之一。接下来,我们将深入探讨如何开始使用Spring框架,讲解各个特性的使用方式。
开始使用Spring框架
方式1:直接下载jar包
进入 repo.spring.io 网址进行下载,完成后将5个jar文件放入工程的lib文件夹,并其加入到Project Structure设置的Modules选项卡中(注:4个spring为最基本的框架,commons开头的文件为日志功能的jar)
注:spring-expression是SpEL的支持,如果不使用Spring表达式语言,可去除;cpmmons-logging是日志的依赖。
这边我使用的是Spring5,spring6的新特性主要体现在云原生方面,基础功能都是一样的。

方式2:使用maven安装依赖
先进入这个网站mvnrepository。查看spring的依赖,和上面直接下载的jar包一样。
点击对应条目,选择依赖版本,将依赖复制到pom.xml中。
pom.xml中最终添加:
1 | |
IOC容器
什么是IOC:
在传统的编程模式中,一个对象负责创建和管理它所依赖的其他对象;而采用IOC之后,对象不再自行创建或查找其所依赖的对象,而是由外部容器(如Spring框架的ApplicationContext)负责创建和管理这些依赖对象,并将它们注入到需要它们的对象中。
IOC如何解耦
IOC就是通过容器实现依赖对象的创建和管理,接下来讲讲IOC的实现方式,也就是解耦过程。
场景:UserService类需要调用UserDAO类的add()方法。
1 | |
很显然,UserService对象需要持有一个UserDAO对象,并通过调用add方法,才能进行注册操作。
原始模式
直接new一个UserDAO对象,并调用add()方法:
1 | |
存在问题:强耦合、违反单一职责原则。
- 强耦合:UserService 与具体的 UserDAO 实现类紧密耦合在一起。这意味着如果未来需要更换 UserDAO 的实现(例如为了优化数据库操作或者切换到新的数据源),那么必须修改 UserService 类的内部实现。高耦合度降低了代码的可复用性和可维护性。
- 违反单一职责原则:UserService 不仅负责业务逻辑(用户注册),还在初始化过程中负责了数据访问对象(DAO)的创建和配置。这样使得 UserService 类承担了过多的责任,不利于职责划分和代码组织。
工厂模式
使用工厂模式对原始模式进行优化:
创建工厂类UserDAOFactory,内含getDAO()方法,调用其会return一个new的UserDAO类,UserService类创建一个UserFactory类并通过getDAO()方法return的UserDAO类进行调用add()方法。
1 | |
优化点:降低耦合度:相比于直接实例化,现在 UserService 与具体的 UserDAO 实现类解耦,通过工厂类来获取 UserDAO 的实例。如果将来需要更换 UserDAO 的实现,只需要修改 UserDAOFactory 即可,无需改动 UserService。
仍存在问题:隐性依赖:虽然通过工厂方法减少了直接依赖,但 UserService 依然隐性地依赖于 UserDAOFactory 的具体实现,尤其是当 UserDAOFactory 内部也含有硬编码创建 UserDAO 的时候。理想情况下,UserDAOFactory 的实例也应该由外部注入,而非在 UserService 内部创建。
IOC解耦
先在配置文件中定义容器如何创建Bean。
1 | |
再在代码中直接使用容器注入的对象:
1 | |
现在的优点:
- 低耦合:UserService 类不再直接创建或管理 UserDAO 的实例,而是通过Spring容器在运行时注入。这样,UserService 只关注业务逻辑,而不关心 UserDAO 的具体实现细节,大大降低了类之间的耦合度。
- 高内聚:UserService 类专注于自身的业务逻辑实现,而 UserDAO 的创建和初始化工作交给了Spring容器,遵循了单一职责原则,提高了代码的内聚性。
- 可配置性:通过XML配置文件定义Bean,可以在不修改任何Java代码的情况下改变系统行为。例如,可以轻易地更换 UserDAO 的实现类,只需在配置文件中修改对应的 class 属性即可。
- 生命周期管理:Spring容器负责管理Bean的整个生命周期,包括初始化、依赖注入、销毁等阶段,简化了对象的管理,提升了整体应用的可维护性。
通过上述案例,应该已经可以理解IOC是如何实现解耦的了,接下来将详细介绍IOC进行依赖注入的方式。
IOC接口
(IOC思想基于IOC容器实现,IOC容器底层即为对象工厂)
常用接口
Spring提供了两种IOC容器实现方式(即两个接口):
- BeanFactory:Spring内部的IOC容器的基本实现,不建议开发人员使用。(特点:懒加载——加载配置文件时不创建对象,使用对象时才创建)
- ApplicationContext:BeanFactory接口的子接口,功能更加强大,建议开发人员使用。(加载配置文件后就会将配置对象进行创建)
- 实现类:FileSystemXmlApplicationContext,通过绝对路径加载容器配置文件,如:
ApplicationContext context = new FileSystemXmlApplicationContext("D:\\编程文件\\Idea_文件\\workspace_Idea\\SpringPractice\\src\\main\\resources\\bean.xml"); - 实现类:ClassPathXmlApplicationContext,通过相对src的路径的路径加载容器配置文件,如:
ApplicationContext context = new ClassPathXmlApplicationContext("/home/chilun/springPractice/src/main/resources/bean.xml");
- 实现类:FileSystemXmlApplicationContext,通过绝对路径加载容器配置文件,如:
使用方式
(User类省略)
配置文件bean.xml:(注意:根元素中的声明不可少。)
1 | |
main函数:
1 | |
输出:
张三
IOC操作:创建对象与注入属性
Bean管理包含两类行为:
- Spring创建对象
- Spring注入属性
通常有两种实现方式:
- XML实现
- 注解实现
组合起来就是4种模式,接下来将一一介绍。
基于xml配置文件方式
创建对象
在spring配置文件中使用bean标签,标签中添加对应属性,即可实现对象创建,如:(即完成空对象创建)
1 | |
属性讲解:
- id:Bean对象的唯一标识。
- class:类的全路径。
- name:和id类型,用于设置多个别名,不推荐使用。
- factory-method:如果不是通过默认构造器创建Bean实例,而是通过静态工厂方法,则需要指定此属性,指出类中用于创建Bean的方法名称。
- factory-bean:当需要通过另一个Bean的实例方法来创建当前Bean时,指定创建Bean的工厂Bean的名称。
- scope:定义Bean的作用域,如 “singleton”(默认,单例模式)、”prototype”(原型模式)、”request”(web应用中,每个HTTP请求对应一个新的Bean实例)、”session”(web应用中,每个HTTP session对应一个新的Bean实例)等。
- init-method:指定在Bean实例化并且所有依赖注入完成后,需要调用的初始化方法。
- destroy-method:指定在Bean从容器中删除之前,需要调用的清理或资源释放方法。
- lazy-init:是否懒加载Bean,设为 true 时,Bean会在第一次请求时才初始化。
在不设置各种属性的情况下,创建对象时默认使用无参构造器。
注入属性
依赖注入概念
这里补充一下依赖注入(Dependency Injection, DI)的概念:
DI是IOC最常见的实现形式,包含构造函数注入、setter方法注入等方式。通过这些方式,容器会在运行时动态地向对象注入所需的依赖对象,而不是对象自己主动去创建或查找依赖。
IOC和DI的区别:
IOC是一种核心思想:将对象创建、生命周期管理和依赖关系协调的控制权从应用程序代码中转移到一个容器中,其关注的是应用程序整体架构层面的控制权转移。
DI是实现这思想的一种手段:当某个类需要另一个类的实例作为其运行时依赖时,不是由类自己创建这个依赖实例,而是通过外部容器。在运行时动态地将依赖注入到需要它的类中,更侧重于如何解决类与类之间依赖关系的传递问题。
基础注入
使用set方法或使用有参构造器注入。
- set方法注入:属性与set方法已经定义完成,在bean标签中使用property标签完成属性注入。(name为类中属性名称,value为向属性注入的值)
1
2
3
4
5<bean id="book" class="com.chilun.spring5.Book">
<property name="bname" value="西游记"></property>
<property name="bauthor" value="吴承恩"></property>
<!--创建对象过程中会自动注入属性的值-->
</bean> - 有参构造器注入:属性与有参构造器已经定义完成,在bean标签中使用constructor-arg标签完成属性注入。
1
2
3
4
5
6
7
8<bean id="orders" class="com.chilun.spring5.Orders">
<constructor-arg name="oname" value="订单1"></constructor-arg>
<constructor-arg name="address" value="湖南长沙"></constructor-arg>
<!--或者使用index属性,index="n"代表第n+1个参数
<constructor-arg index="0" value="订单1"></constructor-arg>
<constructor-arg index="1" value="湖南长沙"></constructor-arg>
-->
</bean>
p名称空间注入
需要先在根元素中声明 xmlns:p 命名空间,指向Spring提供的p命名空间规范地址:
1 | |
然后可以直接在<bean>标签内使用p:前缀结合属性名来注入属性值:
1 | |
字面量注入
- null
1
<property name="bauthor"><null/></property> - 特殊符号
1
2
3<property name="bauthor">
<value> <![CDATA["""<<@南京@>>"""]]> </value> <!--"<![CDATA[具体内容]]>"-->
</property>
对象注入
- 内部bean:创建的bean中有属性为对象类型,在内部进行创建
1
2
3
4
5
6
7
8
9
10
11<bean id="emp" class="com.chilun.spring5.bean.Emp">
<!--设置两个普通属性-->
<property name="ename" value="Lily"/>
<property name="gender" value="女"/>
<!--设置对象属性-->
<property name="dept">
<bean id="dept" class="com.chilun.spring5.bean.Dept">
<property name="dname" value="人事部"/>
</bean>
</property>
</bean> - bean级联:创建的bean中有属性为对象类型,引用已有bean
1
2
3
4
5
6
7
8
9
10<bean id="emp" class="com.chilun.spring5.bean.Emp">
<!--设置两个普通属性-->
<property name="ename" value="Lily"/>
<property name="gender" value="女"/>
<!--设置对象属性-->
<property name="dept" ref="dept"/>
</bean>
<bean id="dept" class="com.chilun.spring5.bean.Dept">
<property name="dname" value="人事部"/>
</bean> - bean级联+属性赋值:创建的bean中有属性为对象类型,引用已有bean,同时注入属性
要求Emp有get方法,以获得dept并进行属性注入。1
2
3
4
5
6
7
8
9<bean id="emp" class="com.chilun.spring5.bean.Emp">
<!--设置两个普通属性-->
<property name="ename" value="Lily"/>
<property name="gender" value="女"/>
<!--设置对象属性-->
<property name="dept" ref="dept"/>
<property name="dept.dname" value="人事部"/>
</bean>
<bean id="dept" class="com.chilun.spring5.bean.Dept"/>
集合注入
- 单独集合:集合的值不复用
1
2
3
4
5
6
7
8
9
10
11
12
13
14
15
16
17
18
19
20
21
22
23
24
25
26
27
28
29
30
31
32
33
34
35
36
37
38
39
40
41
42
43
44
45
46<bean id="stu" class="com.chilun.spring5.collectiontype.Stu">
<!--数组类型属性注入-->
<property name="courses">
<array>
<value>高数</value>
<value>离散</value>
<value>线代</value>
</array>
</property>
<!--List类型属性注入-->
<property name="list">
<list>
<value>数据1</value>
<value>数据2</value>
<value>数据3</value>
</list>
</property>
<!--Map类型属性注入-->
<property name="maps">
<map>
<entry key="JAVA" value="java">
<entry key="PHP" value="php">
</map>
</property>
<!--Set类型属性注入-->
<property name="maps">
<set>
<value>MySQL</value>
<value>SQLite</value>
</set>
</property>
<!--List<Course>类型属性注入-->
<property name="courseList">
<list>
<ref bean="course1"></ref>
<ref bean="course1"></ref>
</list>
</property>
<!-- 其余泛型集合自行类推 -->
</bean>
<bean id="course1" class="com.chilun.spring5.collectiontype.Course">
<property name="cname" value="Qt的基本使用"></property>
</bean>
<bean id="course2" class="com.chilun.spring5.collectiontype.Course">
<property name="cname" value="opencv的基本使用"></property>
</bean> - 公共集合:部分集合值为公共值
需要在根目录中补充util名称空间1
2
3
4
5
6
7
8
9
10
11
12
13
14
15
16
17
18
19<beans xmlns="http://www.springframework.org/schema/beans"
xmlns:xsi="http://www.w3.org/2001/XMLSchema-instance"
xmlns:p="http://www.springframework.org/schema/p"
xmlns:util="http://www.springframework.org/schema/util"
xsi:schemaLocation="
http://www.springframework.org/schema/beans
http://www.springframework.org/schema/beans/spring-beans.xsd
http://www.springframework.org/schema/util
http://www.springframework.org/schema/util/spring-util.xsd">
<!--1.提取list集合类型注入-->
<util:list id="bookList">
<value>红楼梦</value>
<value>水浒传</value>
</util:list>
<!--2.提取list集合类型注入使用-->
<bean id="book" class="com.chilun.spring5.collectiontype.Book">
<property name="list" ref="bookList"></property>
</bean>
</beans>
外部属性文件注入
如德鲁伊连接池的DataSource。
- 直接设置bean
1
2
3
4
5
6<bean id="dataSource" class="com.alibaba.druid.pool.DruidDataSource">
<property name="driverClassName" value="com.mysql.jdbc.Driver"/>
<property name="url" value="jdbc:mysql://localhost:3306/userDb"/>
<property name="username" value="root"/>
<property name="password" value="20030322"/>
</bean> - 通过jdbc.properties配置文件设置bean
添加配置文件:在bean中引入配置文件:1
2
3
4prop.driverClass=com.mysql.jdbc.Driver
prop.url=jdbc:mysql://localhost:3306/userDb
prop.username=root
prop.password=200303221
2
3
4
5
6
7
8
9
10
11
12
13
14
15
16
17
18
19
20
21
22
23<!---引入context名称空间-->
<beans xmlns="http://www.springframework.org/schema/beans"
xmlns:xsi="http://www.w3.org/2001/XMLSchema-instance"
xmlns:p="http://www.springframework.org/schema/p"
xmlns:util="http://www.springframework.org/schema/util"
xmlns:context="http://www.springframework.org/schema/context"
xsi:schemaLocation="http://www.springframework.org/schema/beans
http://www.springframework.org/schema/beans/spring-beans.xsd
http://www.springframework.org/schema/util
http://www.springframework.org/schema/util/spring-util.xsd
http://www.springframework.org/schema/context
http://www.springframework.org/schema/context/spring-context.xsd">
<!--引入外部属性文件-->
<context:property-placeholder location="classpath:jdbc.properties"/>
<!--配置连接池-->
<bean id="dataSource" class="com.alibaba.druid.pool.DruidDataSource">
<!-- 获取properties文件内容,根据key获取,使用spring表达式获取 -->
<property name="driverClassName" value="${prop.driverClass}"/>
<property name="url" value="${prop.url}"/>
<property name="username" value="${prop.username}"/>
<property name="password" value="${prop.password}"/>
</bean>
</beans>
基于注解方式
使用注解的目的:简化xml配置。
注解格式:@注解名称(属性名称=属性值, 属性名称=属性值…)。
注解位置:类、方法、属性等上方。
创建对象
补充spring-aop依赖
下载jar包:
Maven:
1 | |
Spring针对Bean管理中创建对象提供的注解:
- @Component
- @Service
- @Controller
- @Repository
以上4个注解功能相同,都用来创建bean实例。
开启组件扫描
引入context名称空间,并开启组件扫描,即可使用注解方式。
1 | |
组件扫描配置:
1 | |
- use-default-filters属性:false表示不使用默认的filter,使用自己配置的filter。
- context:include-filter标签(类似白名单):设置扫描特定内容(如org.springframework.stereotype.Controller,即扫描注解为@Controller的类)
- context:exclude-filter标签(类似黑名单):设置特定内容不扫描。
创建对象
创建类,并在类上添加注解。
1 | |
属性注入
如:实现service中调用dao类中方法。
- 在service和dao类上方都添加创建对象注释
1
2
3
4
5
6
7
8
9
10
11
12
13
14
15
16
17
18
19
20@Repository//配合AutoWired或Resource
//@Repository(value = "userDaoImpl1")//配合Qualifier或Resource
public class UserDaoImpl implements UserDao {
@Override
public void add() {
System.out.println("dao add.....");
}
}
@Service
public class UserService {
//定义dao类型属性
//@Autowired
//@Qualifier(value = "userDaoImpl1")
@Resource
private UserDao userDao;
public void add() {
userDao.add();
}
} - 在service中注入dao类对象,service中加入dao属性(可以不添加set方法),属性上方添加注解。
- @AutoWired:根据属性类型自动装配。
@Repository,@Autowired。 - @Qualifier:根据名称类型自动装配:
@Repository(value = "userDaoImpl1"),@Qualifier(value = "userDaoImpl1")。 - @Resource:根据名称或类型自动装配。(需import javax.annotation.Resource;)
@Repository,@Resource。 - @Value:注入普通类型属性。
1
2
3
4
5@Service
public class UserService {
@Value(value = "abc")
private String name;
}
- @AutoWired:根据属性类型自动装配。
IOC容器底层
容器启动
- 容器通过工具类(如BeanDefinitionReader)对配置信息文件(通常为xml)进行解析和分析
- 将分析后的信息编组为BeanDefinition
- 将BeanDefinition注册到相应的BeanDefinitionRegistry
Bean实例化
请求方通过容器的getBean方法请求对象时,或隐式调用getBean时就会触发第二阶段的活动
- 检查所请求的对象之前是否已经初始化
- 若没有,则根据BeanDefinition的信息实例化被请求对象,并注入依赖
- 容器将其返回请求方
Bean类型
普通Bean:在xml配置文件中定义的bean类型就是返回的类型。如:
1
2
3
4xml:
<bean id="book" class="com.chilun.spring5.collectiontype.Book"/>
java:
Book book = context.getBean("book",Book.class);工厂Bean:在xml配置文件中定义的bean类型可以和返回类型不同。实现步骤:
- 创建类,作为工厂bean,实现接口FactoryBean
- 实现方法,在方法中定义返回的bean类型
如:
1 | |
Bean作用域
- Spring中可设置bean实例为单实例或多实例。
- 默认情况bean为单实例对象。
- 如何设置为单实例或多实例(通过scope属性):
- singleton(默认):单实例
- prototype:多实例
1
2
3<bean id="book" class="com.chilun.spring5.Book" scope="prototype">
<property name="list" ref="bookList"/>
</bean> - singleton与prototype的其他区别:scope为singleton时,加载spring配置文件时就会创建单实例对象;scope为prototype时,调用getBean方法时创建多实例对象
- 其他值:request(每次请求)、session(每个对话)
Bean生命周期
生命周期是指对象从创建到销毁的全过程。
- bean生命周期
- 通过构造器创建bean实例(无参构造器)
- 为bean的属性设置值、对其他bean调用引用(调用set方法)
- 调用bean的初始化方法(需要配置初始化方法)(使用bean中的init-method属性设置初始化方法)
- bean可使用
- 容器关闭时,调用bean的销毁方法(需配置销毁方法)(使用bean中的destroy-method属性设置销毁方法)
- 演示:
1
2
3<bean id="orders" class="com.chilun.pojo.Orders" init-method="initMethod" destroy-method="destroyMethod">
<property name="oname" value="手机"/>
</bean>1
2
3
4
5
6
7
8
9
10
11
12
13
14
15
16
17
18
19
20
21
22
23
24
25
26
27public class Orders {
//无参数构造
public Orders() {
System.out.println("第一步 执行无参数构造创建bean实例");
}
private String oname;
public void setOname(String oname) {
this.oname = oname;
System.out.println("第二步 调用set方法设置属性值");
}
//创建执行的初始化的方法
public void initMethod() {
System.out.println("第三步 执行初始化的方法");
}
//创建执行的销毁的方法
public void destroyMethod() {
System.out.println("第五步 执行销毁的方法");
}
}
public static void main(String[] args) {
ClassPathXmlApplicationContext context = new ClassPathXmlApplicationContext("bean.xml");
Orders orders = context.getBean("orders", Orders.class);
System.out.println("第四步 获取创建bean实例对象");
System.out.println(orders);
//手动让bean实例销毁
context.close();
}
输出:
第一步 执行无参数构造创建bean实例
第二步 调用set方法设置属性值
第三步 执行初始化的方法
第四步 获取创建bean实例对象
com.chilun.pojo.Orders@18ce0030
第五步 执行销毁的方法
bean的后置处理器
使用后bean生命周期为7步:
- 通过构造器创建bean实例(无参构造器)
- 为bean的属性设置值、对其他bean调用引用(调用set方法)
- 将bean实例传递给bean的后置处理器的postProcessBeforeInitialization方法
- 调用bean的初始化方法(需要配置初始化方法)(使用bean中的init-method属性设置初始化方法)
- 将bean实例传递给bean的后置处理器的postProcessAfterInitialization方法
- bean可使用
- 容器关闭时,调用bean的销毁方法(需配置销毁方法)(使用bean中的destroy-method属性设置销毁方法)
使用后置处理器:
- 创建类,实现接口BeanPostProcessor(重写postProcessBeforeInitialization方法和postProcessAfterInitialization方法),创建后置处理器
1
2
3
4
5
6
7
8
9
10
11
12public class MyBeanPost implements BeanPostProcessor {
@Override
public Object postProcessBeforeInitialization(Object bean, String beanName) throws BeansException {
System.out.println("后置处理器:在Bean初始化之前执行的方法");
return bean;
}
@Override
public Object postProcessAfterInitialization(Object bean, String beanName) throws BeansException {
System.out.println("后置处理器:在Bean初始化之后执行的方法");
return bean;
}
} - 更改配置文件输出:
1
2
3
4
5<bean id="orders" class="com.chilun.pojo.Orders" init-method="initMethod" destroy-method="destroyMethod">
<property name="oname" value="手机"/>
</bean>
<!-- 配置后置处理器,为当前配置文件中的所有bean添加后置处理器。可以通过在后置处理器的实现中检查beanName或者bean的类型,或者检查Bean是否有特定的注解来决定是否执行后置处理操作。-->
<bean id="myBeanPost" class="com.chilun.post.MyBeanPost"/>第一步 执行无参数构造创建bean实例
第二步 调用set方法设置属性值
后置处理器:在Bean初始化之前执行的方法
第三步 执行初始化的方法
后置处理器:在Bean初始化之后执行的方法
第四步 获取创建bean实例对象
com.chilun.pojo.Orders@54c562f7
第五步 执行销毁的方法
更详细的Bean生命周期:
- 加载到 JVM:Spring 容器在启动时,会解析配置文件或扫描注解,创建相应的 BeanDefinition,并将其存储在 BeanDefinitionMap 中。BeanDefinitionMap 是一个 Map,它将 Bean 的名称映射到 BeanDefinition 实例。
- 实例化:当容器需要创建 Bean 时,它会根据 BeanDefinition 的信息创建相应的 Bean 实例。这一步骤通常由 BeanDefinitionReader 和 BeanFactory 负责。BeanFactory 是容器的核心接口,它实际上是一个工厂模式的实现,用于实例化和管理 Bean。在容器启动时,会初始化 BeanFactory,BeanFactory 会根据 BeanDefinition 创建 Bean 实例。
- 属性注入:在实例化后,容器会根据 BeanDefinition 中的属性值配置来进行属性注入。这一过程由 BeanDefinitionMap 中的 BeanDefinition 实例提供的属性信息来完成。
- 初始化前的函数调用:如果 Bean 实现了 BeanNameAware 或 BeanFactoryAware 接口,容器会在实例化后,但在初始化之前,调用相应的方法,使 Bean 可以获取 Bean 的名称或容器的引用;BeanPostProcessor 的实现类也会被调用,允许对 Bean 进行一些前置处理,这一阶段的处理由 AbstractAutowireCapableBeanFactory 的 applyBeanPostProcessorsBeforeInitialization 方法负责。
- 初始化:如果 Bean 实现了 InitializingBean 接口或在 BeanDefinition 中通过 init-method 属性指定了初始化方法,容器会在 Bean 实例化和属性注入之后调用相应的方法,执行 Bean 的初始化逻辑。
- 初始化后的函数调用:在 Bean 初始化之后,BeanPostProcessor 的实现类会被调用,允许对 Bean 进行一些后置处理。这一阶段的处理由 AbstractAutowireCapableBeanFactory 的 applyBeanPostProcessorsAfterInitialization 方法负责。
- Bean使用。
- 销毁:如果 Bean 实现了 DisposableBean 接口,或者在配置中通过 destroy-method 属性指定了销毁方法,容器会在 Bean 销毁阶段调用相应的方法,执行 Bean 的销毁逻辑。这一过程由 DisposableBean 接口的 destroy 方法或在 BeanDefinition 中指定的 destroy-method 属性负责。
AOP面向切面编程
AOP概念
面向切面编程
AOP(Aspect-Oriented Programming的简称),也就是面向切面编程的意思,它是一种编程思想,在Spring的官方文档中描述: 面向切面编程(AOP)提供了另一种思考程序结构的方式来对面向对象编程(OOP)的进行补充和完善,面向对象编程(OOP)中关键的是对象,而面向切面编程(AOP)中关键的是切面。
AOP中切面可以实现关注点的模块化(即统一抽取,提高复用),例如跨越多种类型和对象的事务管理,这种关注点在 AOP 文献中通常被称为横切关注点。
单单看文字描述可能比较抽象,下面我们通过具体例子结合图片来形象化这些概念。
假如有两个洗澡函数:
男函数: 脱衣服、唱歌、洗脸、洗头、洗身体、擦干身体、穿衣服
女函数: 脱衣服、洗脸、洗头、护发、洗身体、擦干身体、护肤、穿衣服
发现问题: 通过上面的例子,我们会发现无论男女,脱衣服、穿衣服是洗澡不可缺少的步骤,而且这两个步骤在“洗澡”这个业务不是核心,它只是一个关注点,因为脱衣服和穿衣服的场景并不只是在洗澡中存在,就比如: 天气热我们需要脱衣服,天气冷我们需要穿衣服,所以,将衣服的管理定义成一个模块,然后在需要的地方调用才是是一个更加合理的设计,具体如下图: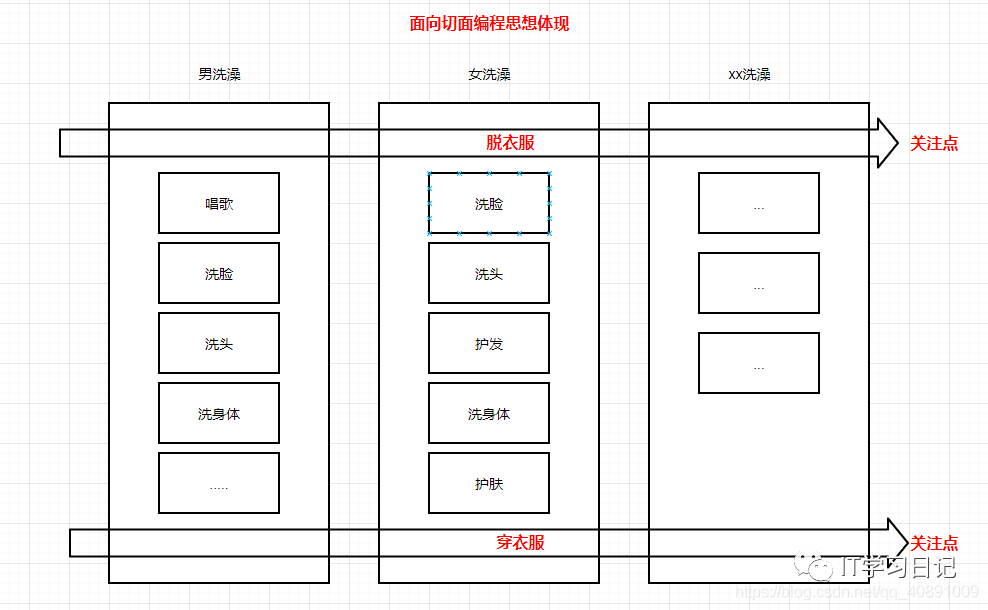
如最常用的日志以及事务功能,它们都可能是横向的分布在不通的业务层级(对象层级)中,但是又和具体的核心业务无直接关系,诸如这样类型的代码,在程序中被称作**横切(cross cutting)**,我们应该考虑将这一类代码进行统一管理,提高复用性。
面向切面编程(AOP)就是将这类与核心业务无关的,但又影响着多个类的公共行为抽取、封装到一个可重用模块,从而实现代码复用和模块解耦的目的,这种开发思想则被称为面向切面编程。
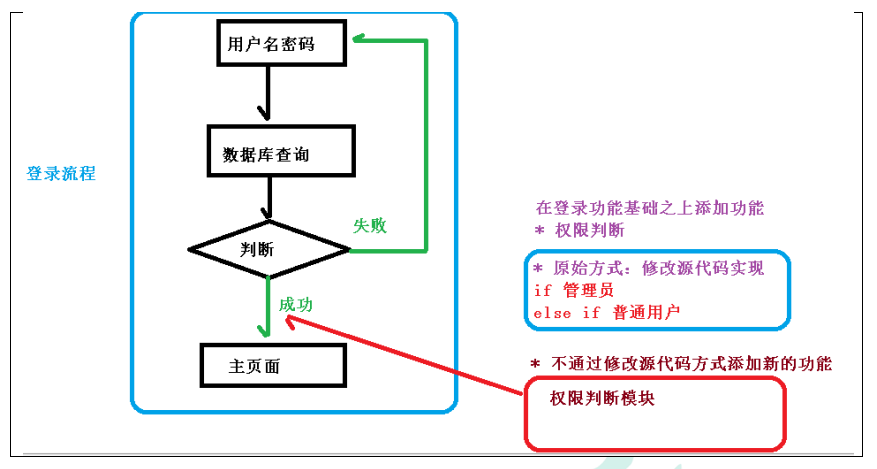
通俗解释:不通过修改源代码方式,在主干功能里面添加新功能:
AOP底层原理
Spring AOP底层使用动态代理实现:
- 当目标类有接口时,Spring AOP 会选择使用 JDK 动态代理机制来创建代理对象。JDK 动态代理通过 java.lang.reflect.Proxy 类及其 newProxyInstance() 方法来创建代理,并且需要用户提供一个实现了 InvocationHandler 接口的类,这个类负责处理代理对象上的方法调用,并在调用前后插入切面逻辑。
- 当目标类没有实现任何接口时,由于 JDK 动态代理无法直接应用于类,Spring AOP 将自动转而使用 CGLIB 库来生成代理类,这个代理类继承自目标类并重写其中的方法,在方法调用前后同样执行切面逻辑。
JDK动态代理
为方便理解底层实现,使用Proxy手动实现代理进行演示。
- 使用Proxy类的方法创建代理对象
调用newProxyInstance方法
方法源码:newProxyInstance方法的三个参数:1
2
3
4
5
6
7
8
9
10
11
12
13
14
15
16
17
18
19
20
21
22/**
* Returns a proxy instance for the specified interfaces
* that dispatches method invocations to the specified invocation
* handler.
*/
@CallerSensitive
public static Object newProxyInstance(ClassLoader loader,
Class<?>[] interfaces,
InvocationHandler h) {
Objects.requireNonNull(h);
final Class<?> caller = System.getSecurityManager() == null
? null
: Reflection.getCallerClass();
/*
* Look up or generate the designated proxy class and its constructor.
*/
Constructor<?> cons = getProxyConstructor(caller, loader, interfaces);
return newProxyInstance(caller, cons, h);
}
- 类加载器
- 增强方法所在类的接口(可为多个)
- 实现接口InvocationHandler的类,创建代理对象,写增强的方法
- 代码演示:
- 创建接口,定义方法:
1
2
3
4public interface UserDao {
public int add(int a,int b);
public void update(String id);
} - 创建接口实现类,实现方法:
1
2
3
4
5
6
7
8
9
10
11public class UserDaoImpl implements UserDao {
@Override
public int add(int a, int b) {
return a + b;
}
@Override
public void update(String id) {
System.out.println(id);
}
} - 使用Proxy创建接口代理对象
1
2
3
4
5
6
7
8
9
10
11
12
13
14
15
16
17
18
19
20
21
22
23
24
25
26
27
28public class JDKProxy {
public static void main(String[] args) {
//创建接口代理对象
Class[] interfaces = {UserDao.class};
UserDaoImpl userDao = new UserDaoImpl();
UserDao dao = (UserDao) Proxy.newProxyInstance(JDKProxy.class.getClassLoader(), interfaces, new UserDaoProxy(userDao));
//执行代理方法
System.out.println(dao.add(1, 2));
}
}
class UserDaoProxy implements InvocationHandler {
//1.获得被代理对象
//有参构造传递
private Object obj;
public UserDaoProxy(Object obj) {
this.obj = obj;
}
@Override
public Object invoke(Object proxy, Method method, Object[] args) throws Throwable {
//方法之前
System.out.println("执行方法之前..." + method.getName() + "参数:" + Arrays.toString(args));
//被增强的方法执行
Object res = method.invoke(obj, args);
//方法之后
System.out.println("执行方法之后..." + obj);
return res;
}
}
- 创建接口,定义方法:
AOP专业术语
- 连接点:类中可以被增强的方法被称为连接点。
- 切入点:类中真正被增强的方法被称为切入点。
- 通知:类中实际增强的逻辑部分被称为通知(又称增强)。
- 切面:将通知应用到切入点的过程称为切面。
切入点表达式
- 作用:标注对特定类的特定方法进行增强
- 语法结构:
execution([权限修饰符] [返回类型] [类全路径] [方法名称](参数列表)
权限修饰符可省略,可用 * 代表全部类型。
一个方法参数可以使用 * 号代替;如果想代表方法的任意参数,可使用 ..。
- 例1:对com.chilun.dao.BookDao类中的add方法增强
execution(* com.chilun.dao.BookDao.add(..)) - 例2:对com.chilun.dao.BookDao类中的所有方法增强
execution(* com.chilun.dao.BookDao.*(..)) - 例3:对com.chilun.dao包中的所有类中的所有方法增强
execution(* com.chilun.dao.*.*(..))
通知(又称增强)
通知有多种类型:
- 前置通知@Before
- 后置通知@AfterReturning
- 环绕通知@Around
- 异常通知@AfterThrowing
- 最终通知@After
AOP操作
Spring 自身提供了 AOP 支持,但若要利用 AspectJ 的注解驱动风格(如 @Aspect、@Before、@After、@Around 等)进行更复杂、更强大的切面编程,则通常需要添加 AspectJ 相关的依赖项。
AspectJ介绍
AspectJ不是Spring组成部分,是独立的AOP框架,一般将AspectJ和Spring框架一起使用,进行AOP操作。
准备工作:引入AspectJ相关依赖。

或使用Maven导入依赖:
1 | |
基于AspectJ实现AOP操作
基于注解方式(主要)
1. 创建被增强类,定义方法
1 | |
2. 创建增强类(编写增强逻辑)
在增强类里面,创建方法,让不同方法代表不同通知类型
1 | |
3. 通知配置
- 在Spring配置中开启注解扫描、开启生成代理对象。
1
2
3
4
5
6
7
8
9
10
11
12
13<?xml version="1.0" encoding="UTF-8"?>
<beans xmlns="http://www.springframework.org/schema/beans"
xmlns:xsi="http://www.w3.org/2001/XMLSchema-instance"
xmlns:context="http://www.springframework.org/schema/context"
xmlns:aop="http://www.springframework.org/schema/aop"
xsi:schemaLocation="http://www.springframework.org/schema/beans http://www.springframework.org/schema/beans/spring-beans.xsd
http://www.springframework.org/schema/context http://www.springframework.org/schema/context/spring-context.xsd
http://www.springframework.org/schema/aop http://www.springframework.org/schema/aop/spring-aop.xsd">
<!--开启注解扫描-->
<context:component-scan base-package="com.chilun"/>
<!--在Spring配置文件中开启生成代理对象-->
<aop:aspectj-autoproxy/>
</beans> - 使用注解创建User和UserProxy对象;在增强类上方添加注解@Aspect。
1
2
3
4
5
6
7
8
9
10
11
12
13
14
15
16
17//使用注解创建User和UserProxy对象
@Component
public class User {
public void add() {
System.out.println("add.......");
}
}
//使用注解创建User和UserProxy对象
@Component
//在增强类上方添加注解@Aspect
@Aspect
public class UserProxy {
//前置通知
public void before() {
System.out.println("before......");
}
}
4. 配置不同类型通知
在增强类中,在通知方法上方添加通知类型注解,使用切入点表达式:
1 | |
测试代码:
1 | |
结果:
before……
add…….
测试代码2:
1 | |
结果:
Around前……
Before……
add…….
AfterReturning……
After……
Around后……
公共切入点抽取@Pointcut
通过将多个通知方法共享的切入点表达式抽象成一个单独的 @Pointcut 方法,避免了在多个通知中重复编写相同的切入点表达式,从而减少冗余代码。
举例:
1 | |
输出:
Before……
add…….
After……
多个增强类对应同一个方法增强,可设置优先级
在增强类上面添加注解@Order(自然数),值越小,优先级越高
1 | |
基于xml配置文件实现
- 创建增强类和被增强类,创建方法
1
2
3
4
5
6
7
8
9
10
11
12
13
14
15
16public class User {
public void add() {
System.out.println("add.......");
}
}
public class UserProxy {
public void before() {
System.out.println("Before......");
}
}
//测试代码
public static void main(String[] args) {
ApplicationContext context = new ClassPathXmlApplicationContext("bean.xml");
User user = context.getBean("user", User.class);
user.add();
} - 在spring配置文件中创建两个类对象
- 在spring配置文件中配置切入点
1
2
3
4
5
6
7
8
9
10
11
12
13
14
15
16
17
18
19
20
21
22
23
24
25
26
27<?xml version="1.0" encoding="UTF-8"?>
<beans xmlns="http://www.springframework.org/schema/beans"
xmlns:xsi="http://www.w3.org/2001/XMLSchema-instance"
xmlns:context="http://www.springframework.org/schema/context"
xmlns:aop="http://www.springframework.org/schema/aop"
xsi:schemaLocation="
http://www.springframework.org/schema/beans
http://www.springframework.org/schema/beans/spring-beans.xsd
http://www.springframework.org/schema/context
http://www.springframework.org/schema/context/spring-context.xsd
http://www.springframework.org/schema/aop
http://www.springframework.org/schema/aop/spring-aop.xsd">
<!-- 2.创建对象 -->
<bean id="user" class="com.chilun.pojo.User"/>
<bean id="userProxy" class="com.chilun.pojo.UserProxy"/>
<!-- 3.配置aop增强 -->
<aop:config>
<!-- 切入点 -->
<aop:pointcut id="p" expression="execution(* com.chilun.pojo.User.add(..))"/>
<!-- 配置切面 -->
<aop:aspect ref="userProxy">
<!-- 增强作用在具体的方法上 -->
<aop:before method="before" pointcut-ref="p"/>
</aop:aspect>
</aop:config>
</beans>
输出:
Before……
add…….
- 本文写于2023年初,经修正后发布于个人博客。 ↩